
Sometimes it may be desired to use another DNS server(s) instead of the DNS servers assigned from the immediate Internet Service Providers. Here, we cover 3 necessary PARTS and the configurations required on the ezhotspot extender.
The settings for alternative DNS servers are as follows:
OpenDNS
- 208.67.222.222 (IPv4)
- 208.67.220.220 (IPv4)
- 2620:119:35::35 (IPv6)
- 2620:119:53::53 (IPv6)
Google DNS
- 8.8.8.8 (IPv4)
- 8.8.4.4 (IPv4)
- 2001:4860:4860::8888 (IPv6)
- 2001:4860:4860::8844 (IPv6)
CloudFare DNS
- 1.1.1.1 (IPv4)
- 1.0.0.1 (IPv4)
- 2606:4700:4700::1111 (IPv6)
- 2606:4700:4700::1001 (IPv6)
For the purpose of this configuration tutorial, the CloudFare DNS will be applied.
PART A - DNS Forwarding
DNS Forwarding forwards all the connected clients on the ezhotspot and their DNS queries to a specific DNS server(s) instead of the immediate Internet Service Provider.
01. Go to Advanced Dashboard --> Network --> DHCP and DNS --> General Settings --> DNS Forwardings
02. Enter Cloudfare IPv4 & IPv6 DNS settings as shown in the picture below.
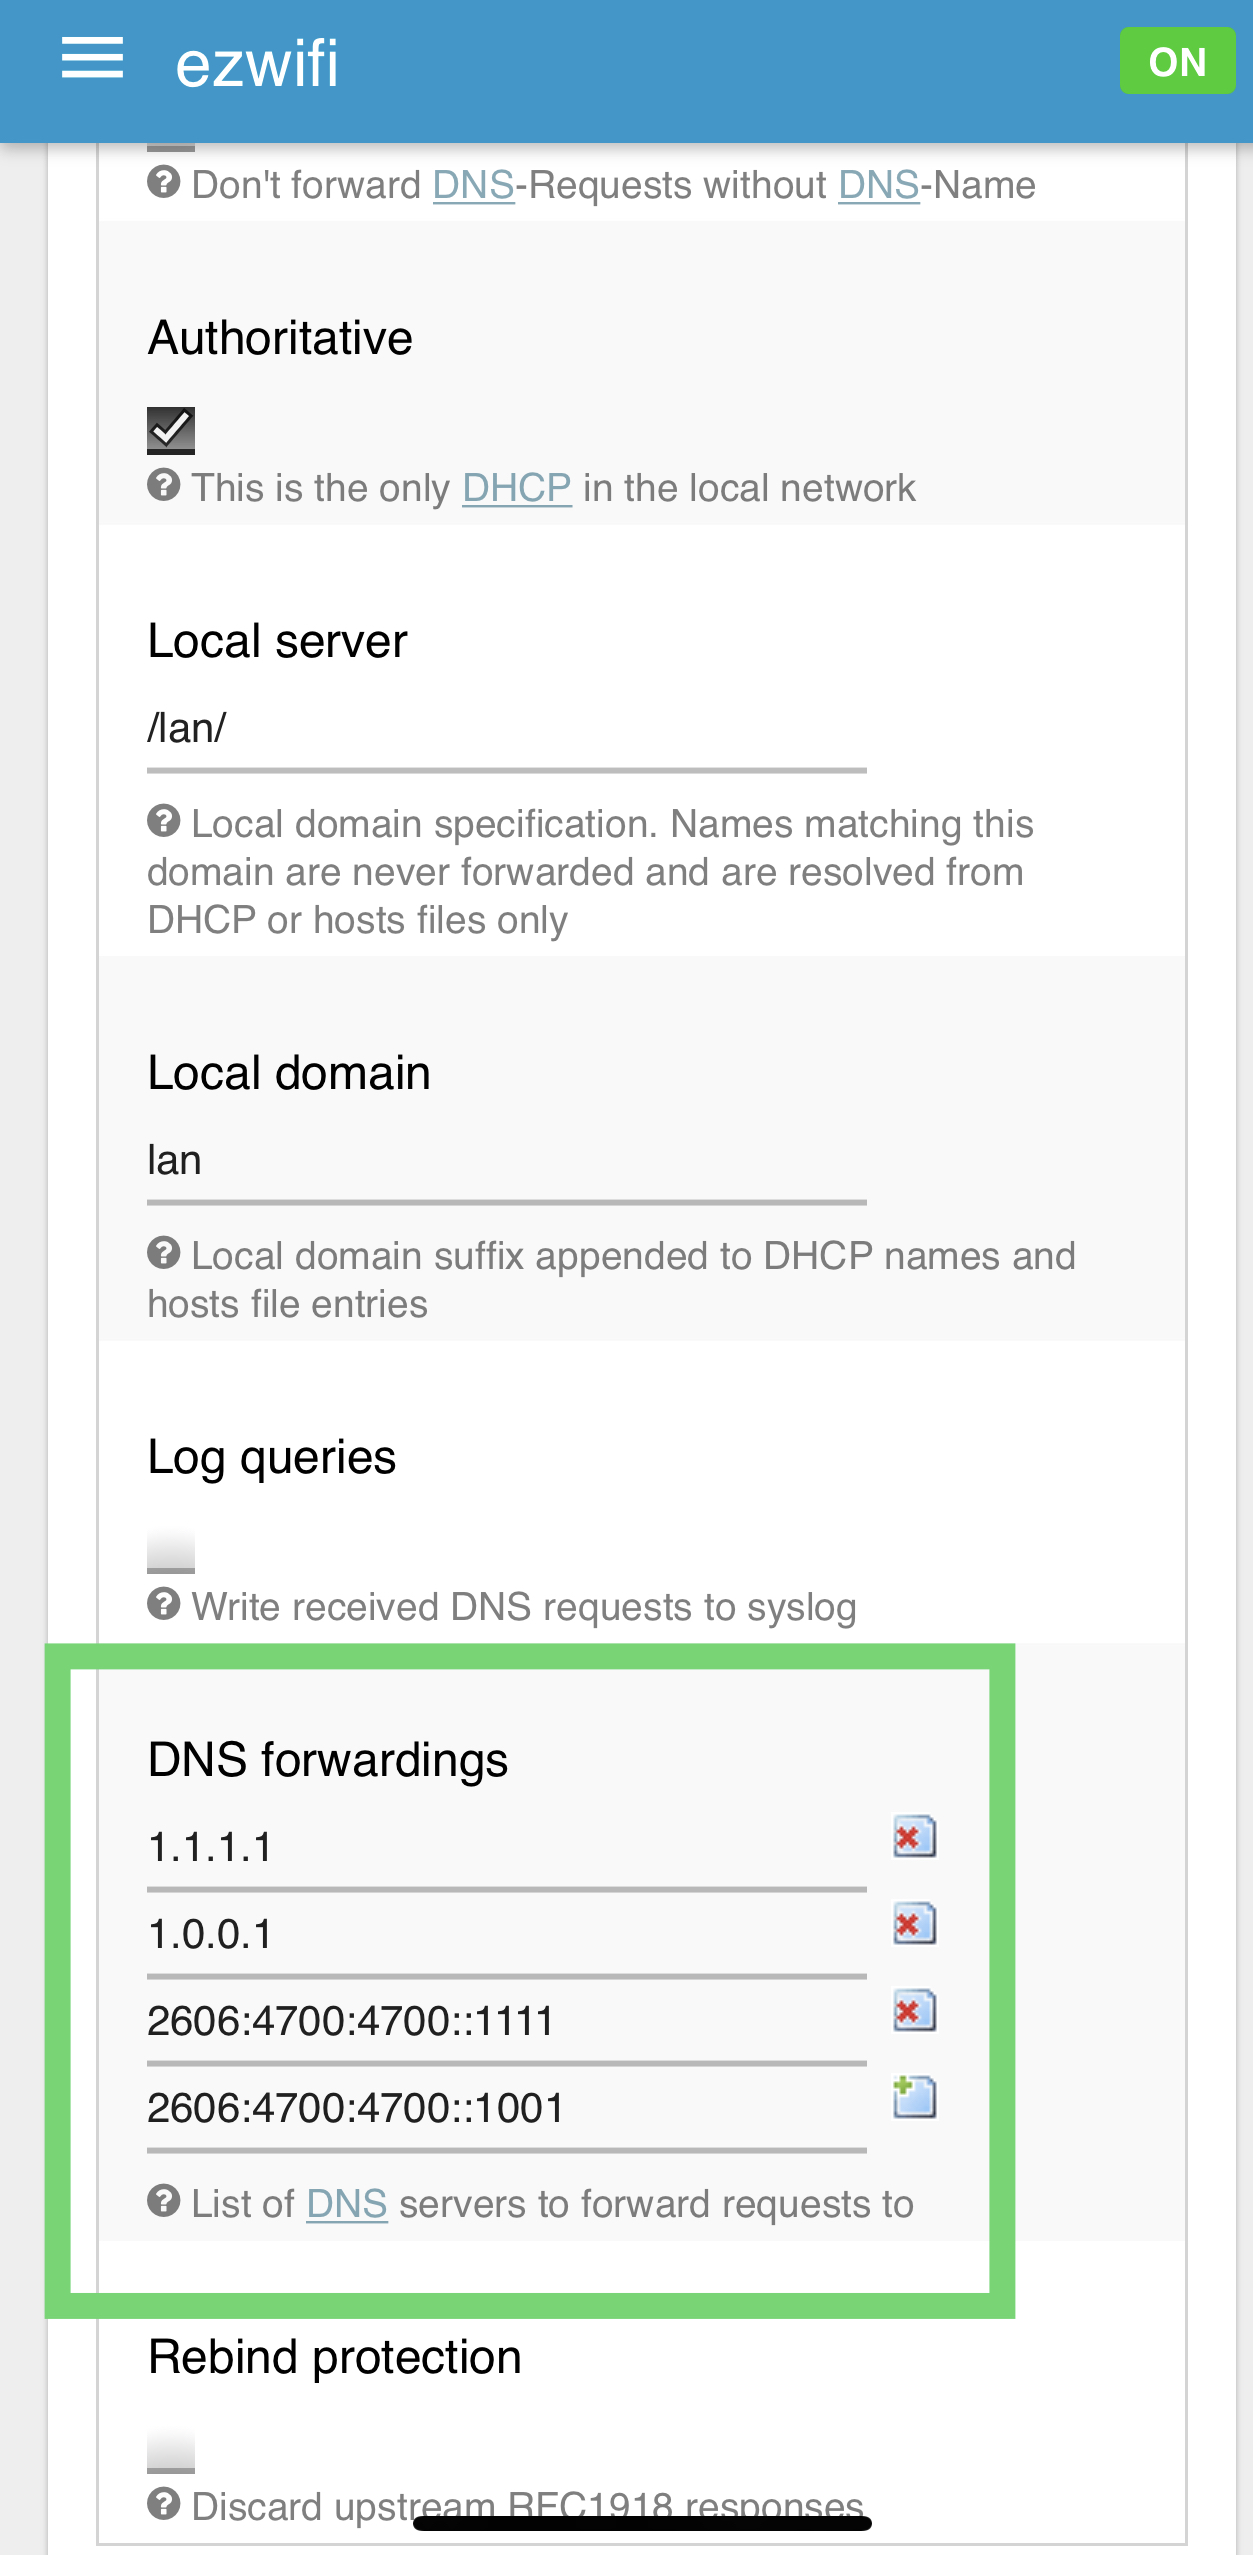
03. Scroll down the page and click on SAVE & APPLY button.
04. Go to Advanced Dashboard --> Network --> DHCP and DNS --> Advanced Settings --> Strict Order
05. Enable as shown in picture below.
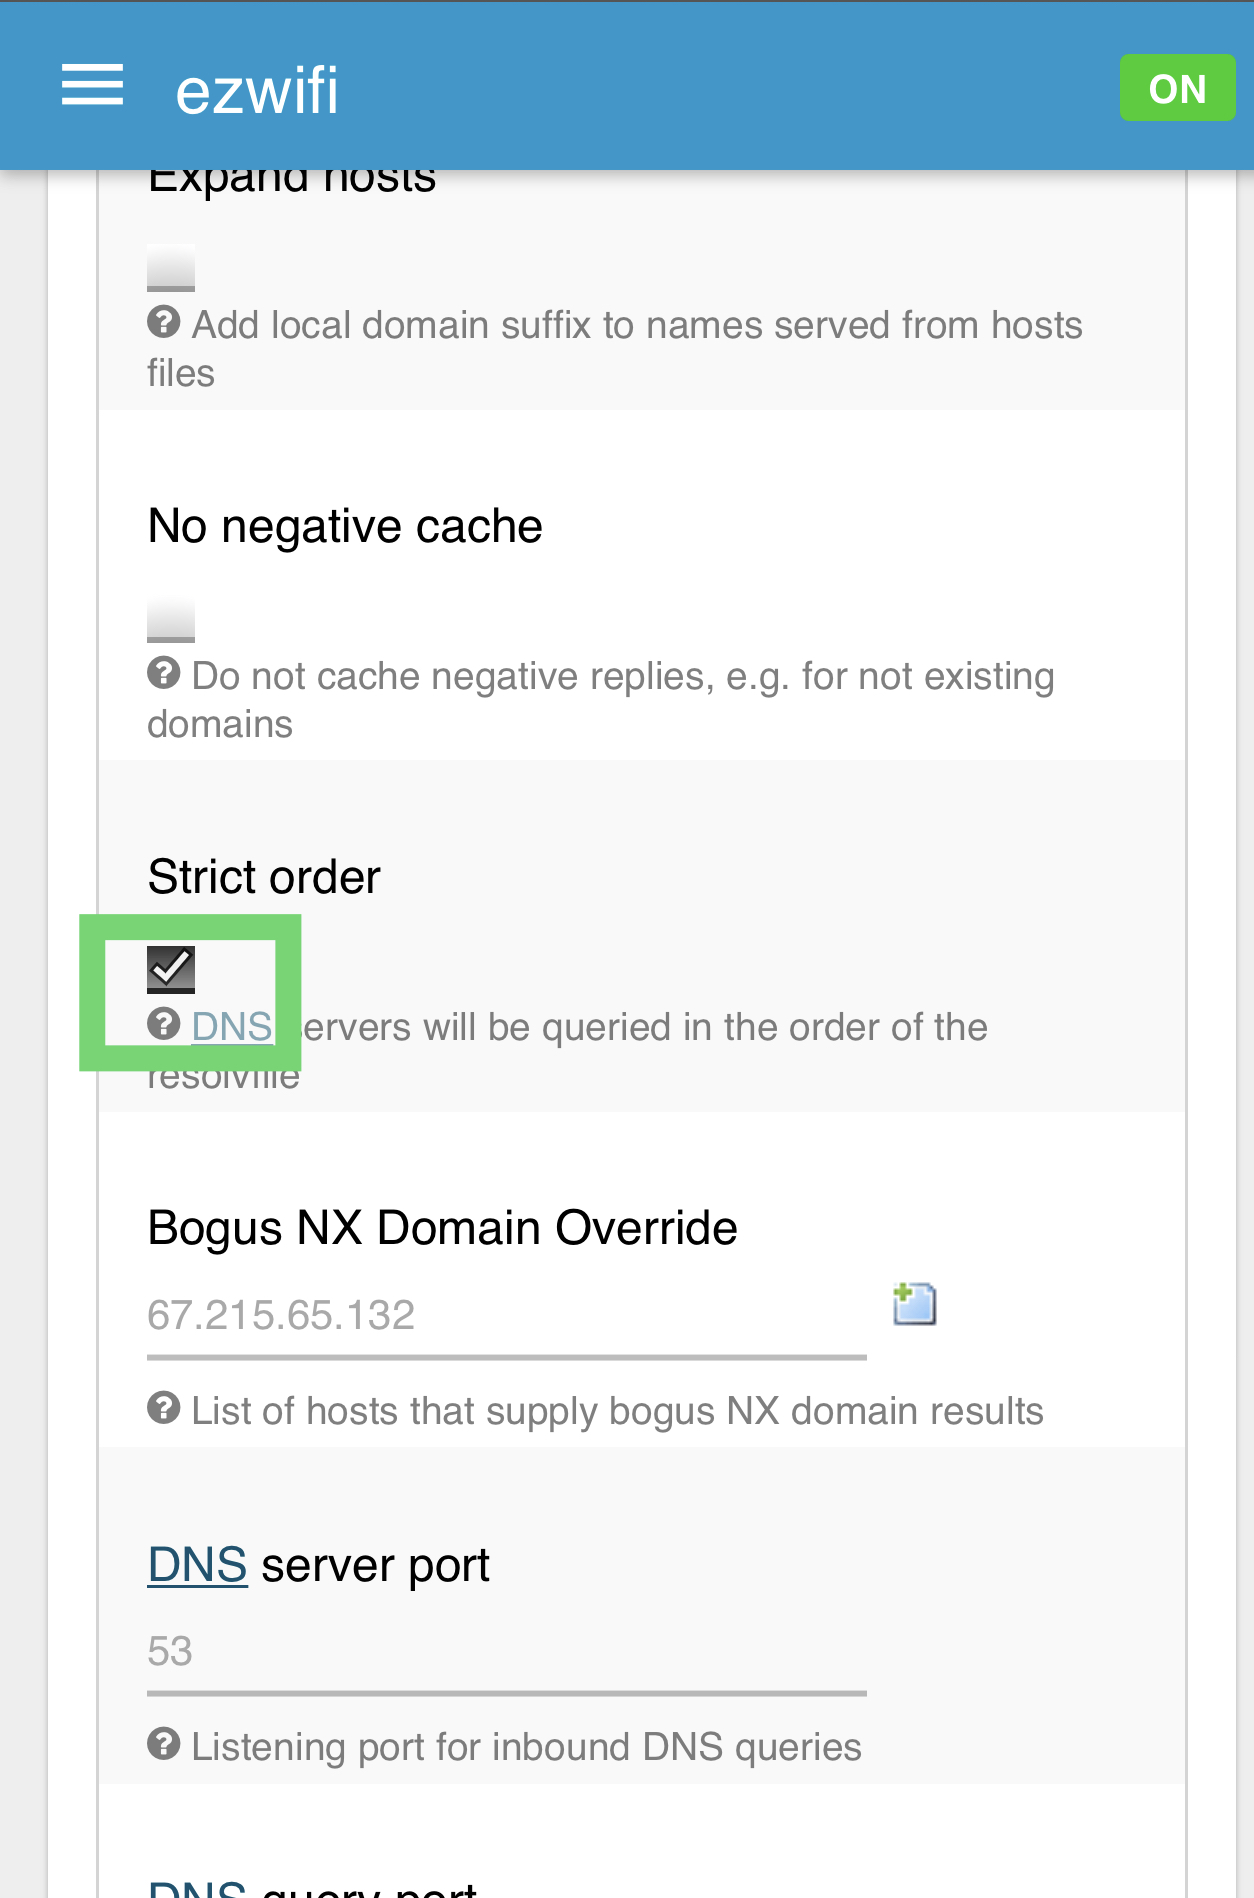
06. Scroll down the page and click on SAVE & APPLY button.
PART B - DHCP Server on the ezhotspot extender
The ezhotspot extender itself operates a DHCP server. By default, the ezhotspot extender assigns the DNS setting of 192.168.93.1 to the connected clients on the private SSID and 172.20.20.1 on the guest network. In this tutorial, we apply the customized settings to the default private SSID. Same settings can be applied to the guest network by repeating the entire PART B process by selecting the GUESTWIFI .
01. Go to Advanced Dashboard --> Network --> Interfaces --> MY_NETWORK --> Common Configuration --> General Settings --> IPv6 assignment length
02. Select Custom, then enter 64 as shown in picture below.
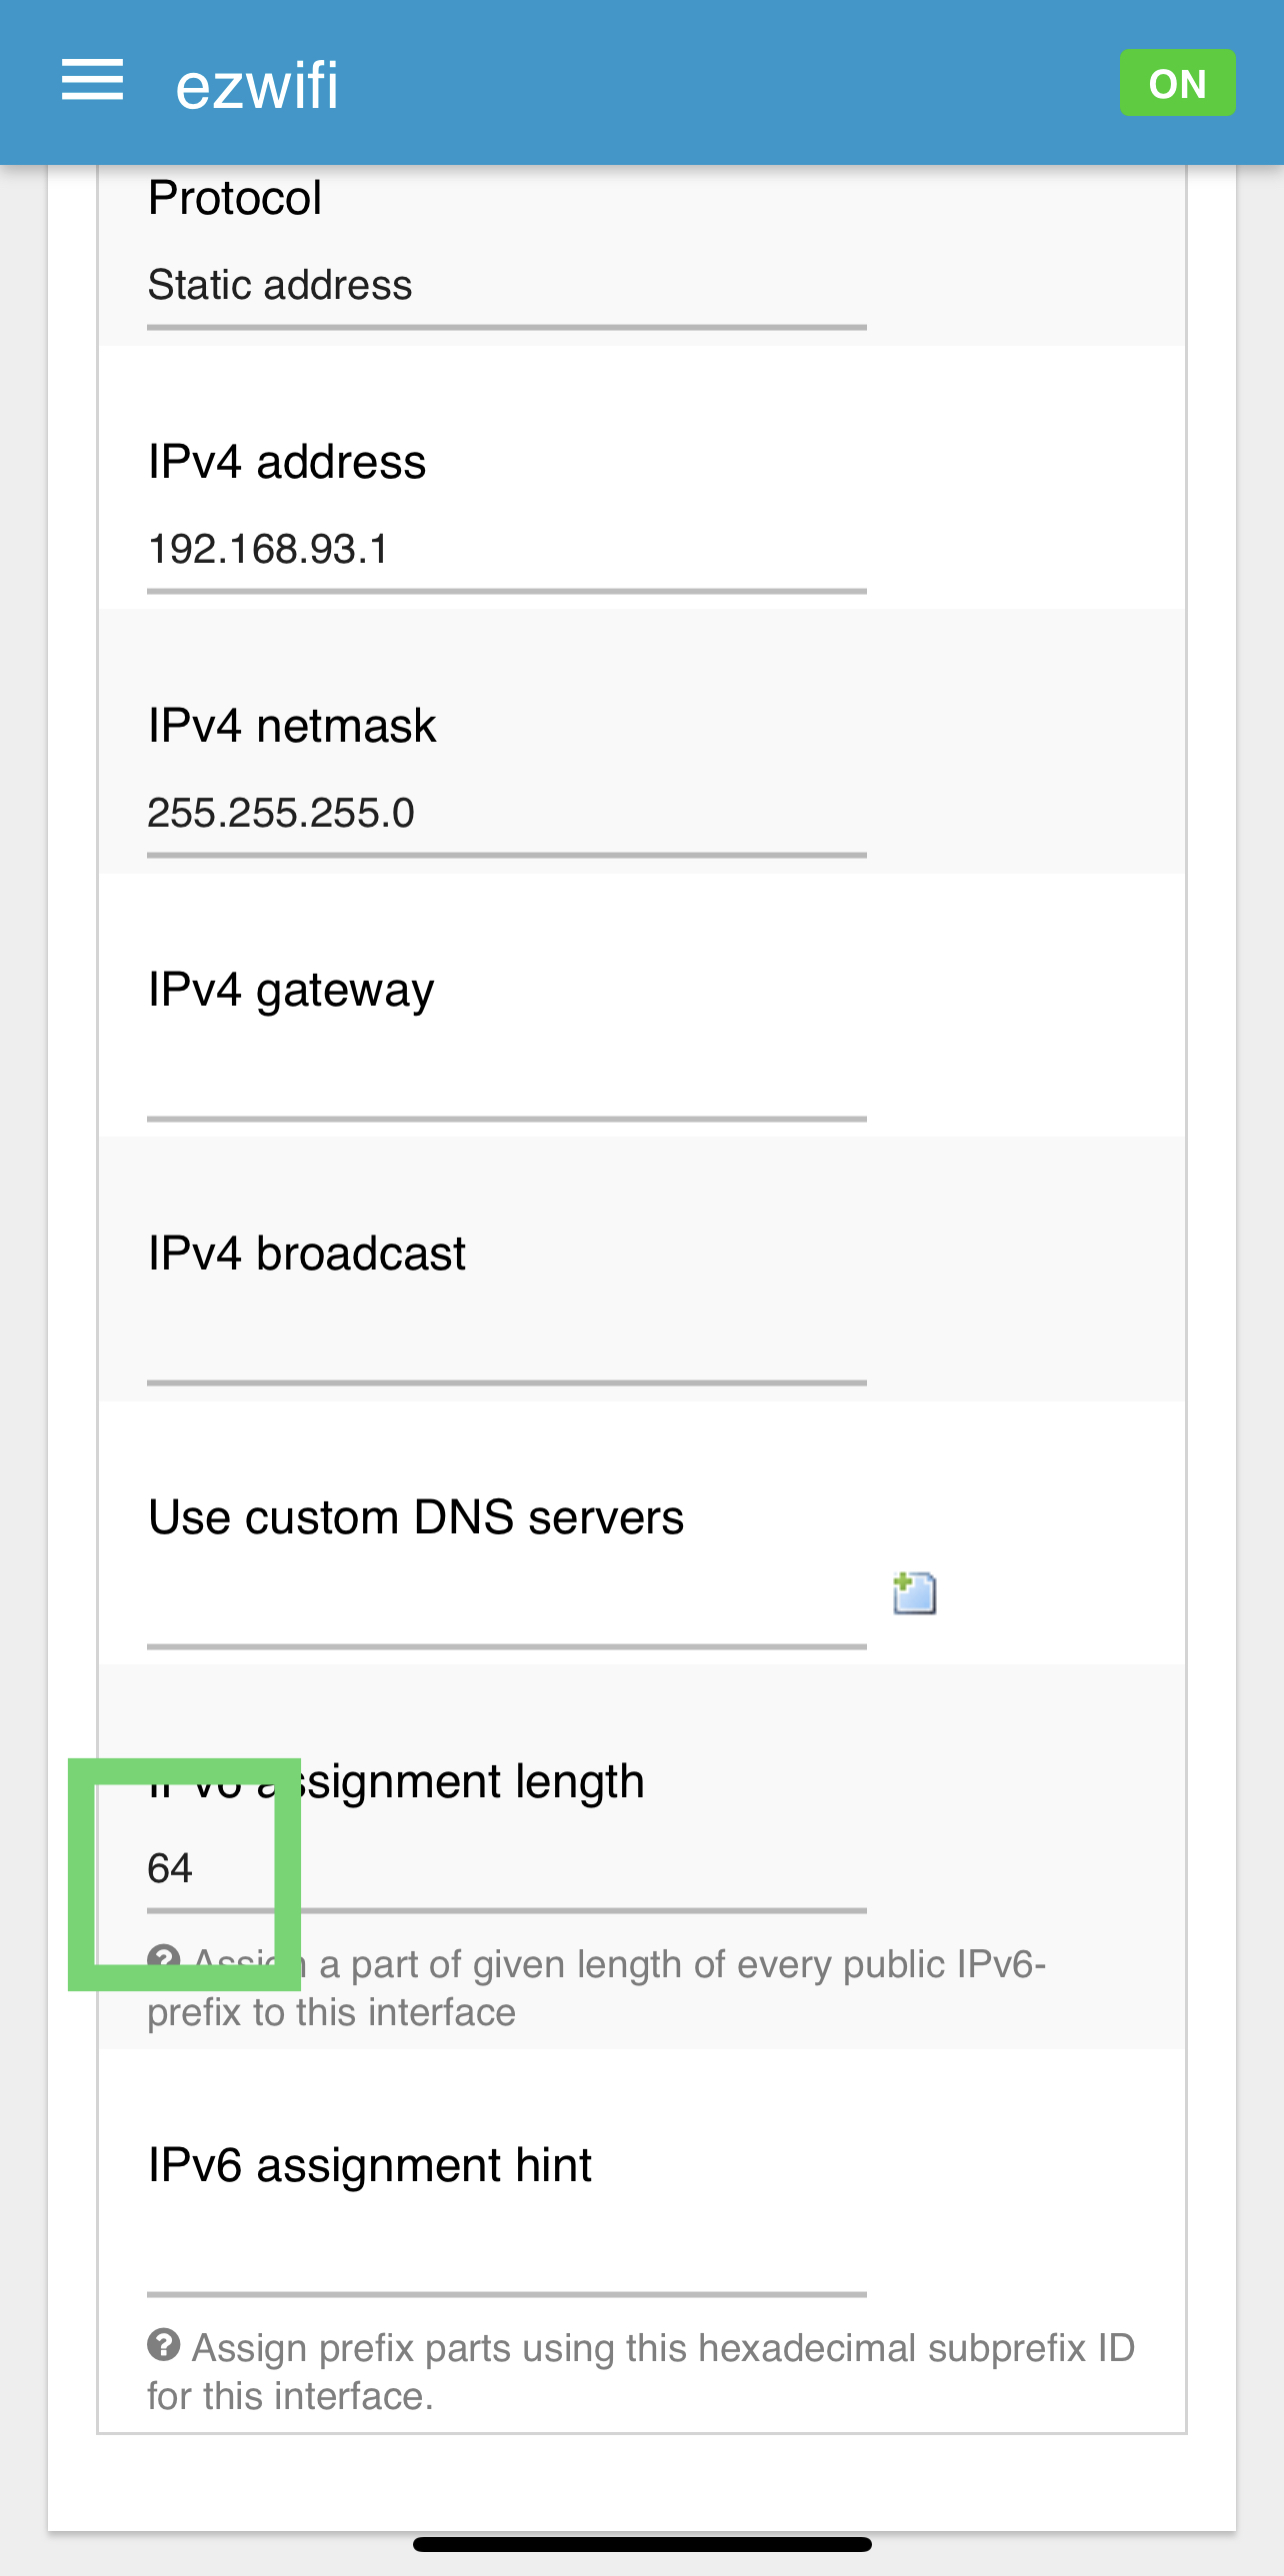
03. Scroll down the page and click on SAVE & APPLY button.
04. Go to Advanced Dashboard --> Network --> Interfaces --> MY_NETWORK --> DHCP Server --> General Setup --> Advanced Settings --> DHCP-Options
05. Enter 6,1.1.1.1,1.0.0.1 exactly as shown in picture below.
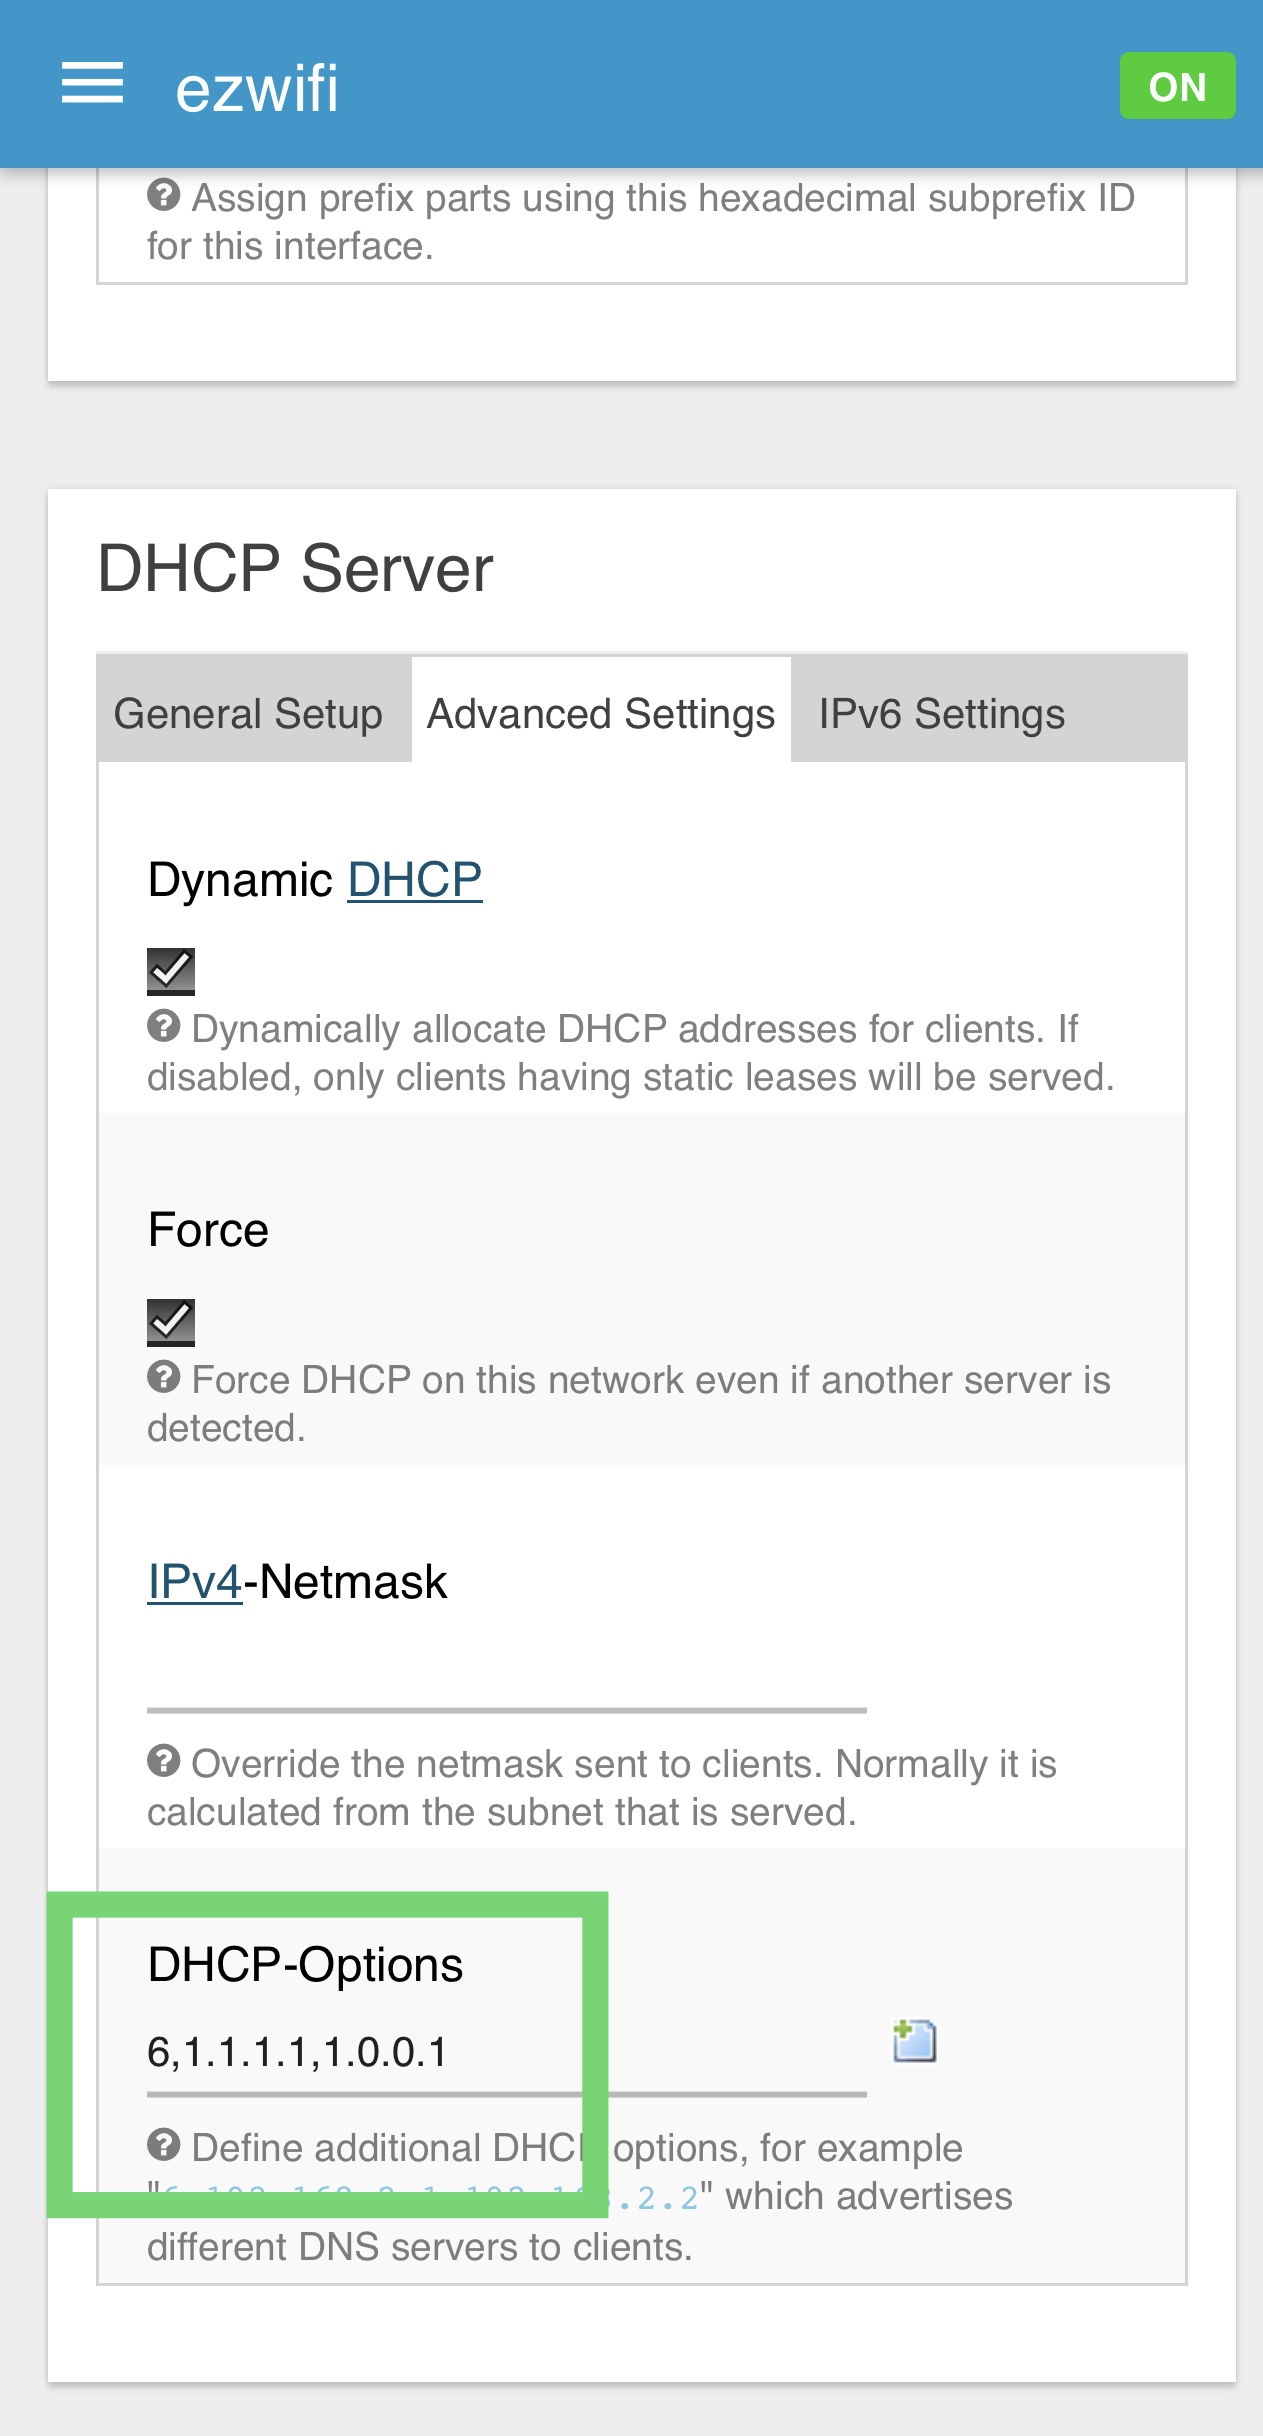
06. Scroll down the page and click on SAVE & APPLY button.
07. Go to Advanced Dashboard --> Network --> Interfaces --> MY_NETWORK --> DHCP Server --> Gerneral Setup --> IPv6 Settings
08. Select exactly as shown in picture below. Enter the cloudfare IPv6 DNS settings in the Announced DNS Servers. Enter ezhotspot.eu in the Announced DNS Domain.
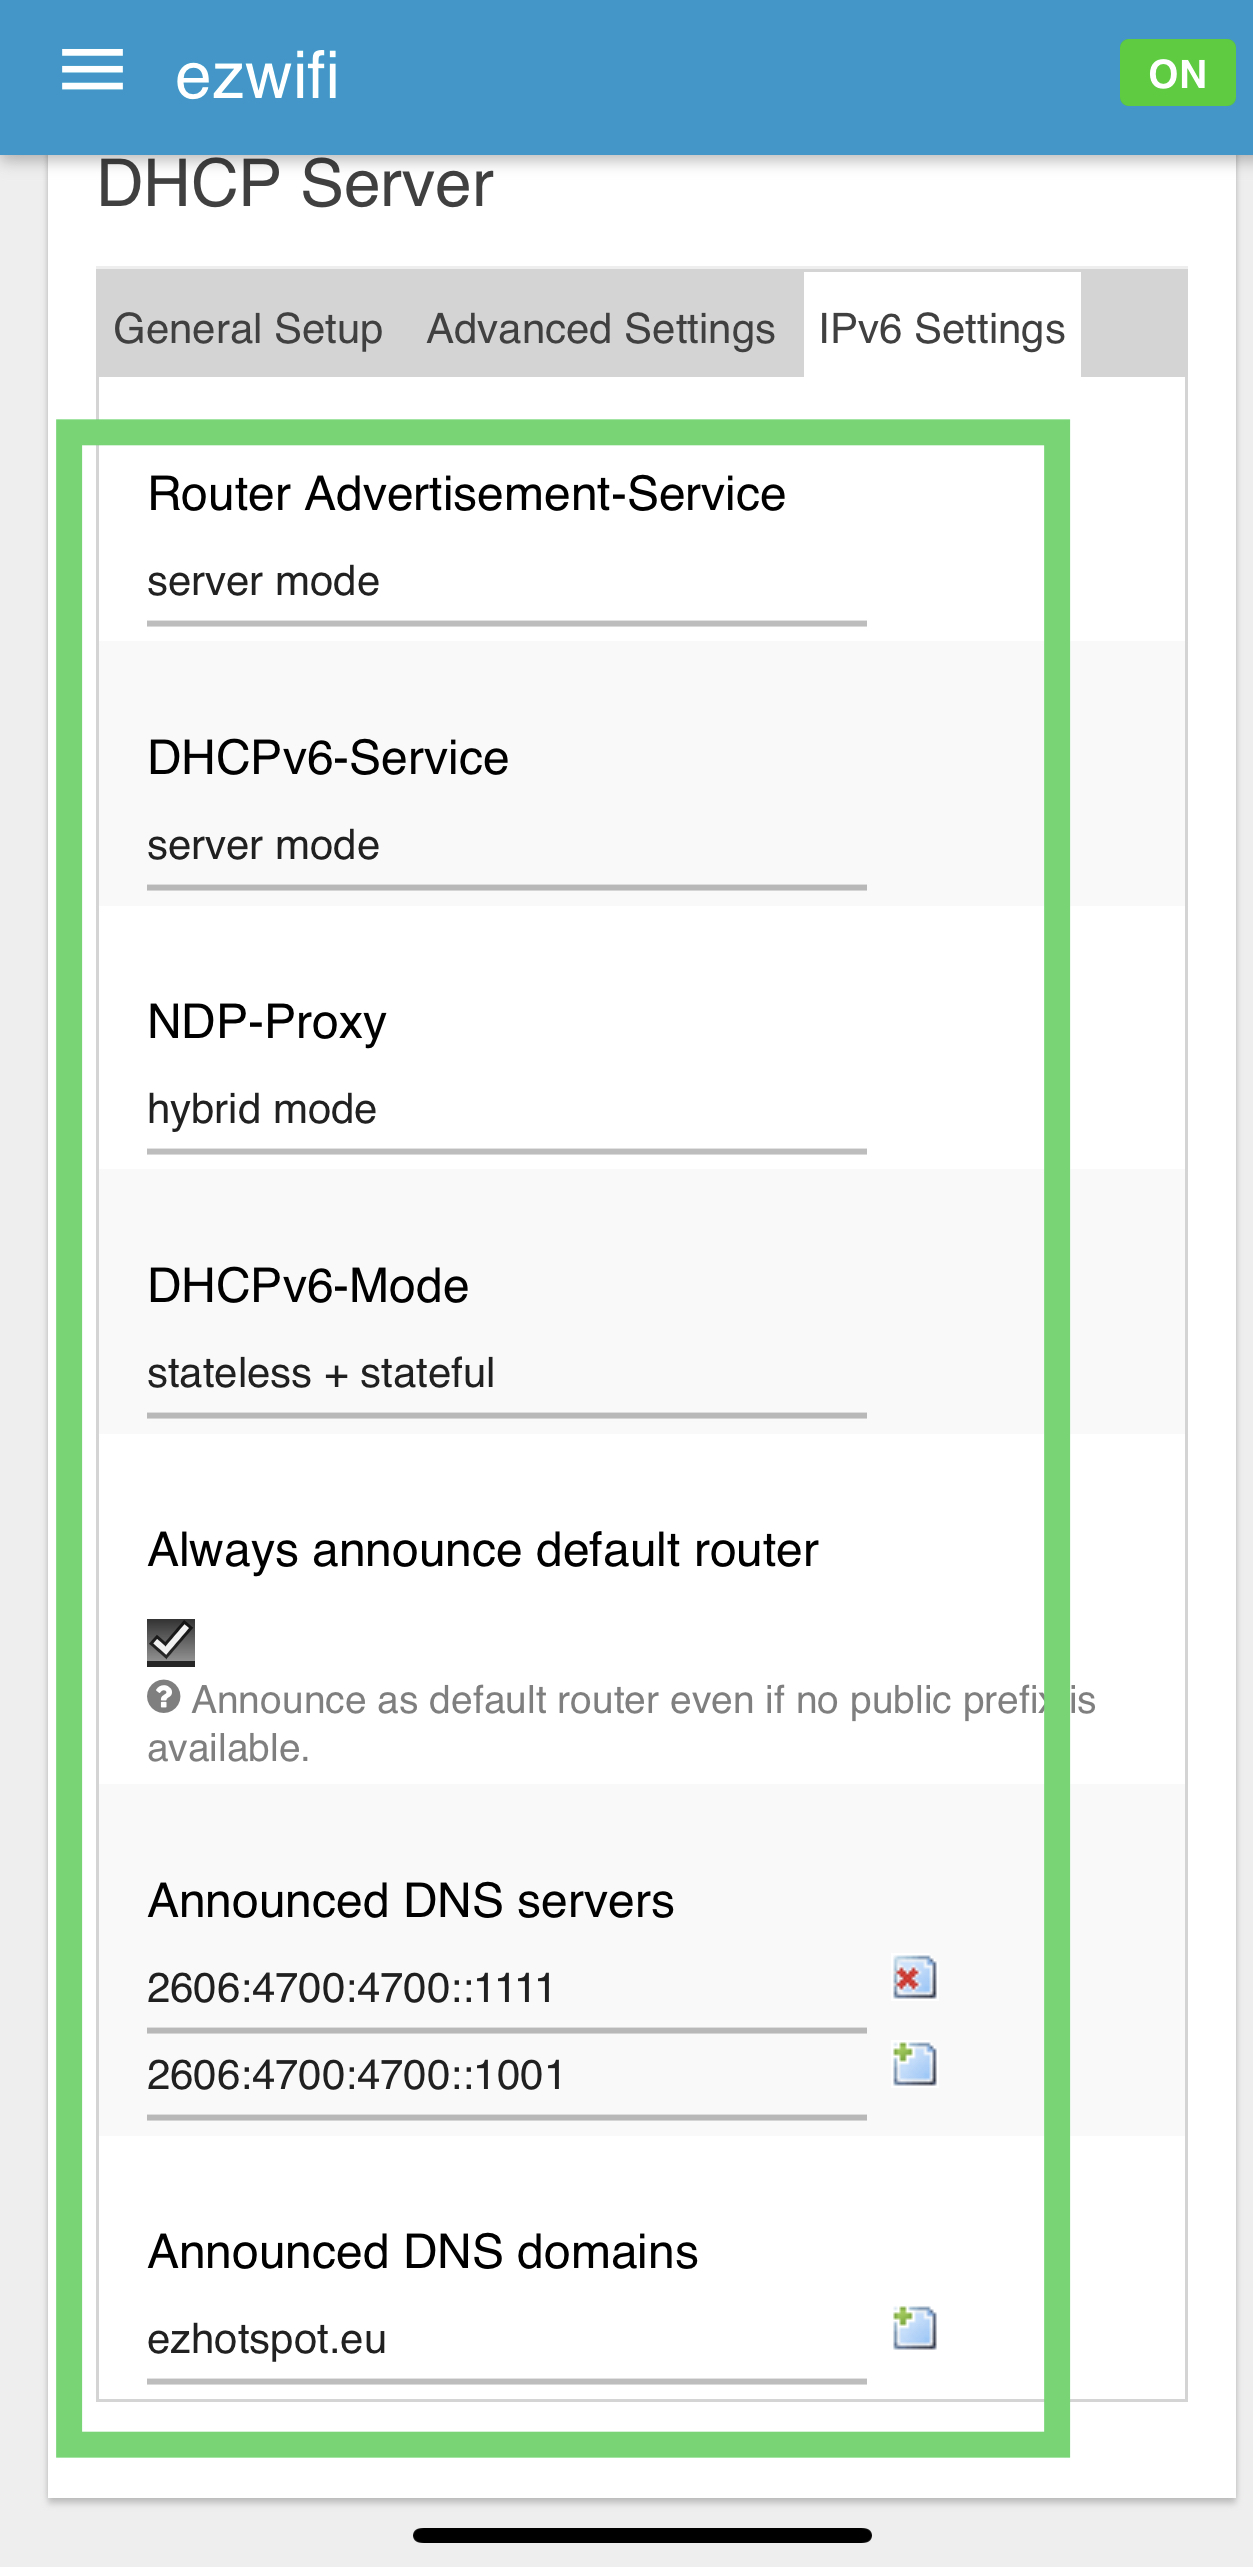
09. Scroll down the page and click on SAVE & APPLY button.
PART C - Ezhotspot customized DNS
The ezhotspot itself is also a client device and by default, it will obtain the DNS settings as advertised by the immediate Internet Service Provider. On the V5, there can be 5 different internet sources while on the V4, there can be up to 3 different internet sources.
In this tutorial, we will apply the settings on a V5 which is connected on the HOTSPOT24 interface. Same settings can be applied depending on the interface of the internet source by repeating the entire PART C process by selecting the connected interfaces if desired .
01. Go to Advanced Dashboard --> Network --> Interfaces --> HOTSPOT24 --> Advanced Settings
02. Enable Use builtin IPv6-management as shown in BOX1 of picture below.
03. Disable Use DNS servers as advertised by peer, as shown in BOX2 of picture below.
04. Enter Cloudfare's IPv4 & IPv6 DNS settings as shown in BOX3 of picture below.
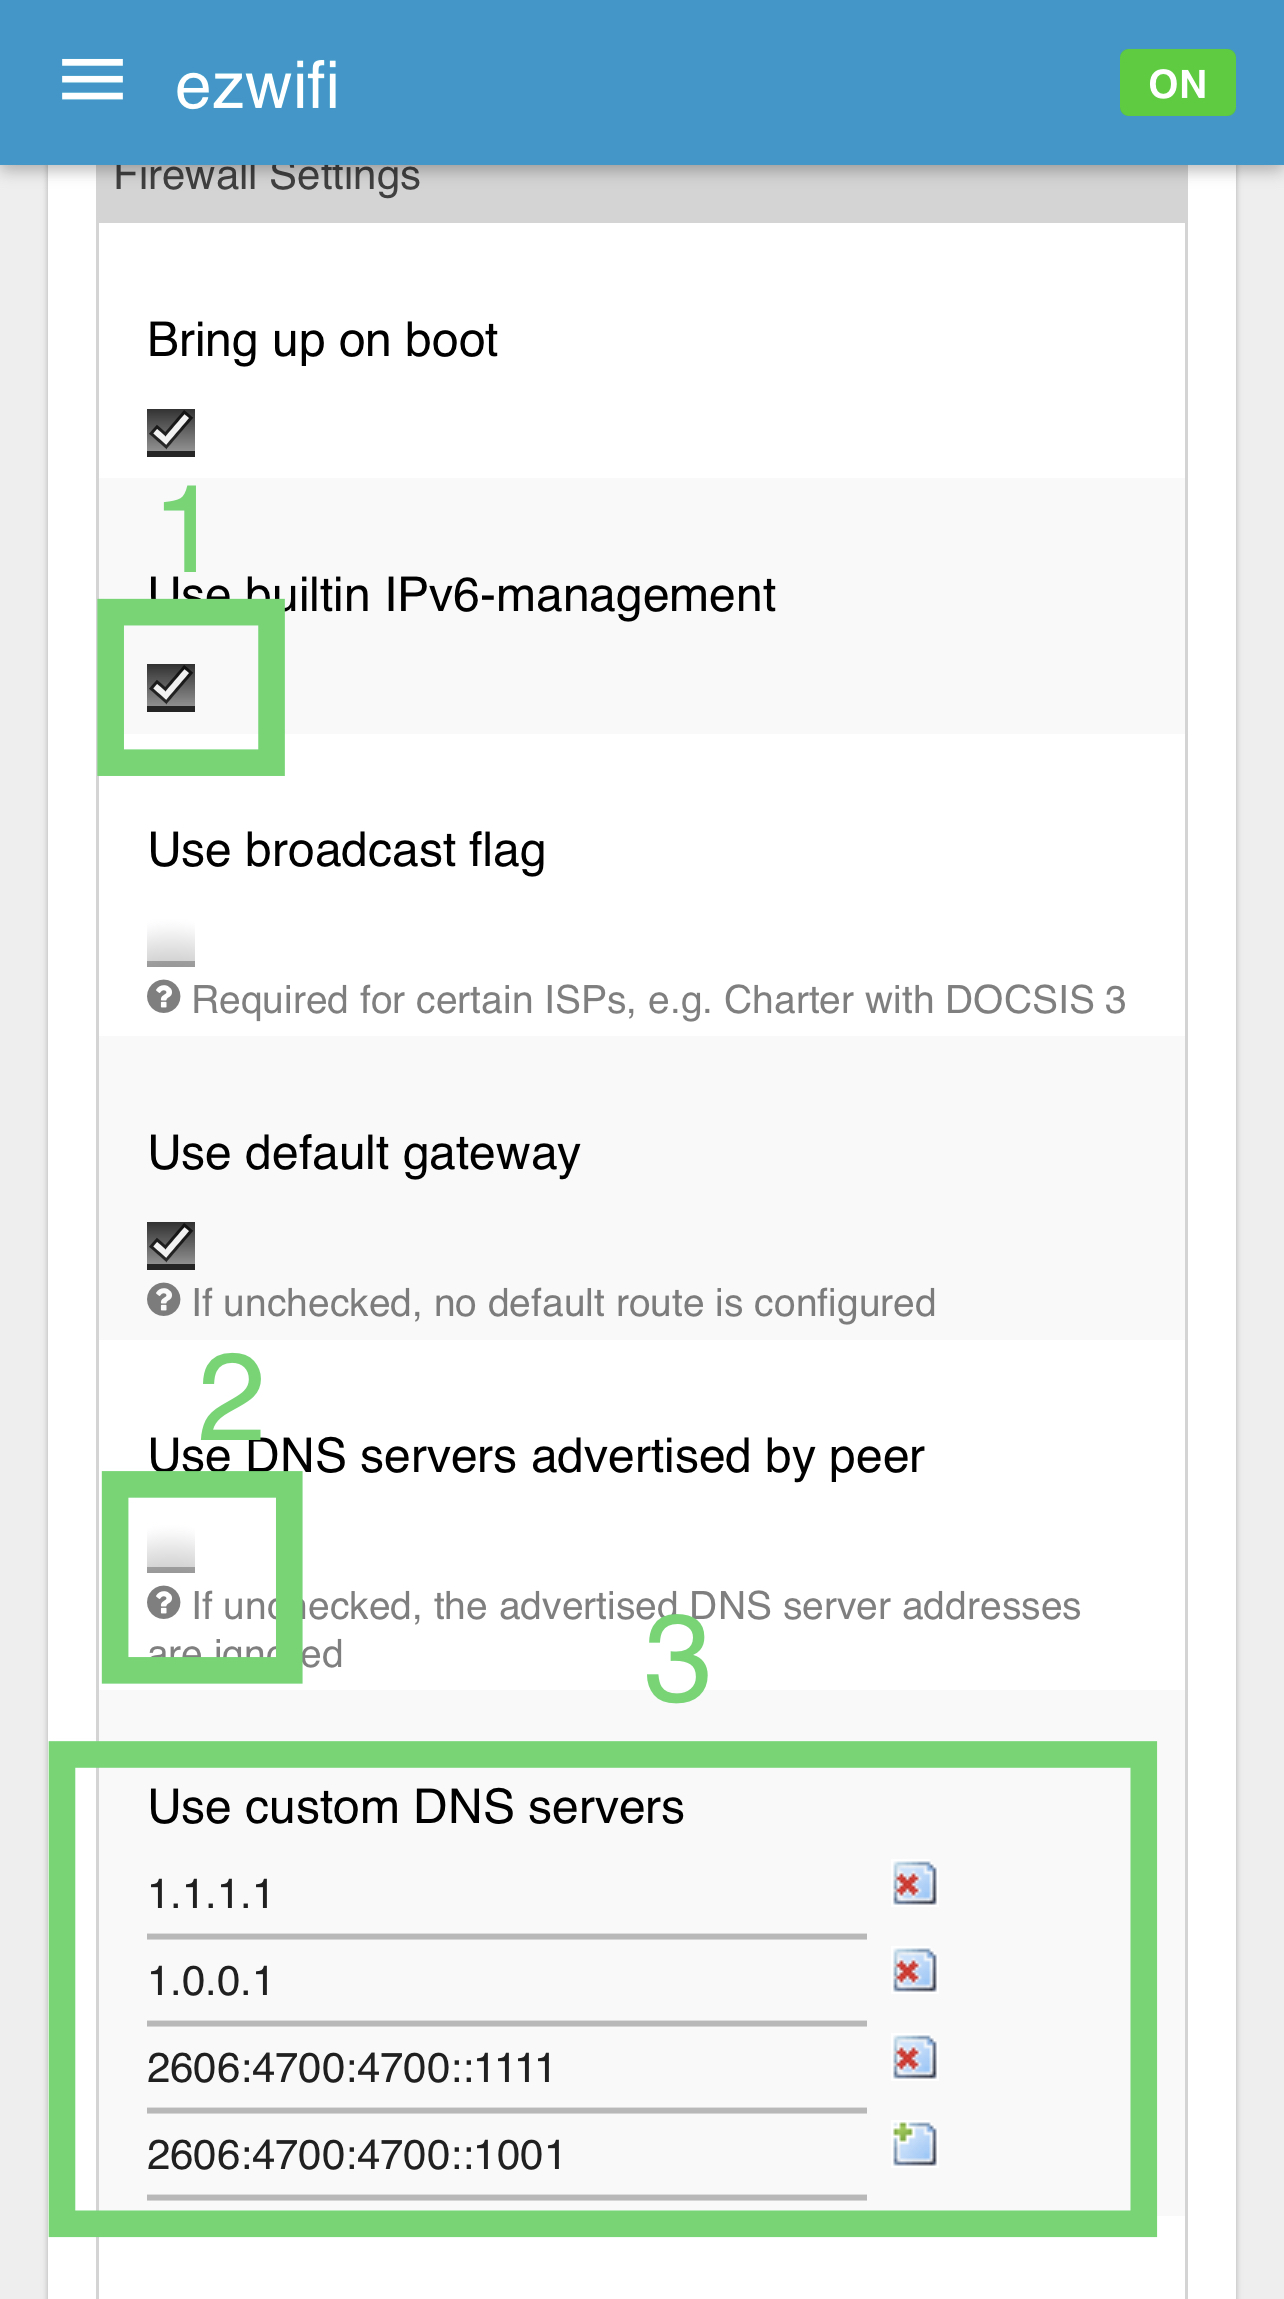
05. Scroll down the page and click on SAVE & APPLY button.
We have now completed all 3 PARTS required. Disconnected all client devices from the ezhotspot and reconnect to the ezhotspot for the new settings to be applied.
There are many possible methods of verifying your new DNS setting. On some client devices, it may require the downloading of third-party app or a terminal console to perform a NSLOOKUP. For this tutorial, we will show you some possibilities of verifying your new DNS setting on some common client devices without downloading any app or using a terminal console.
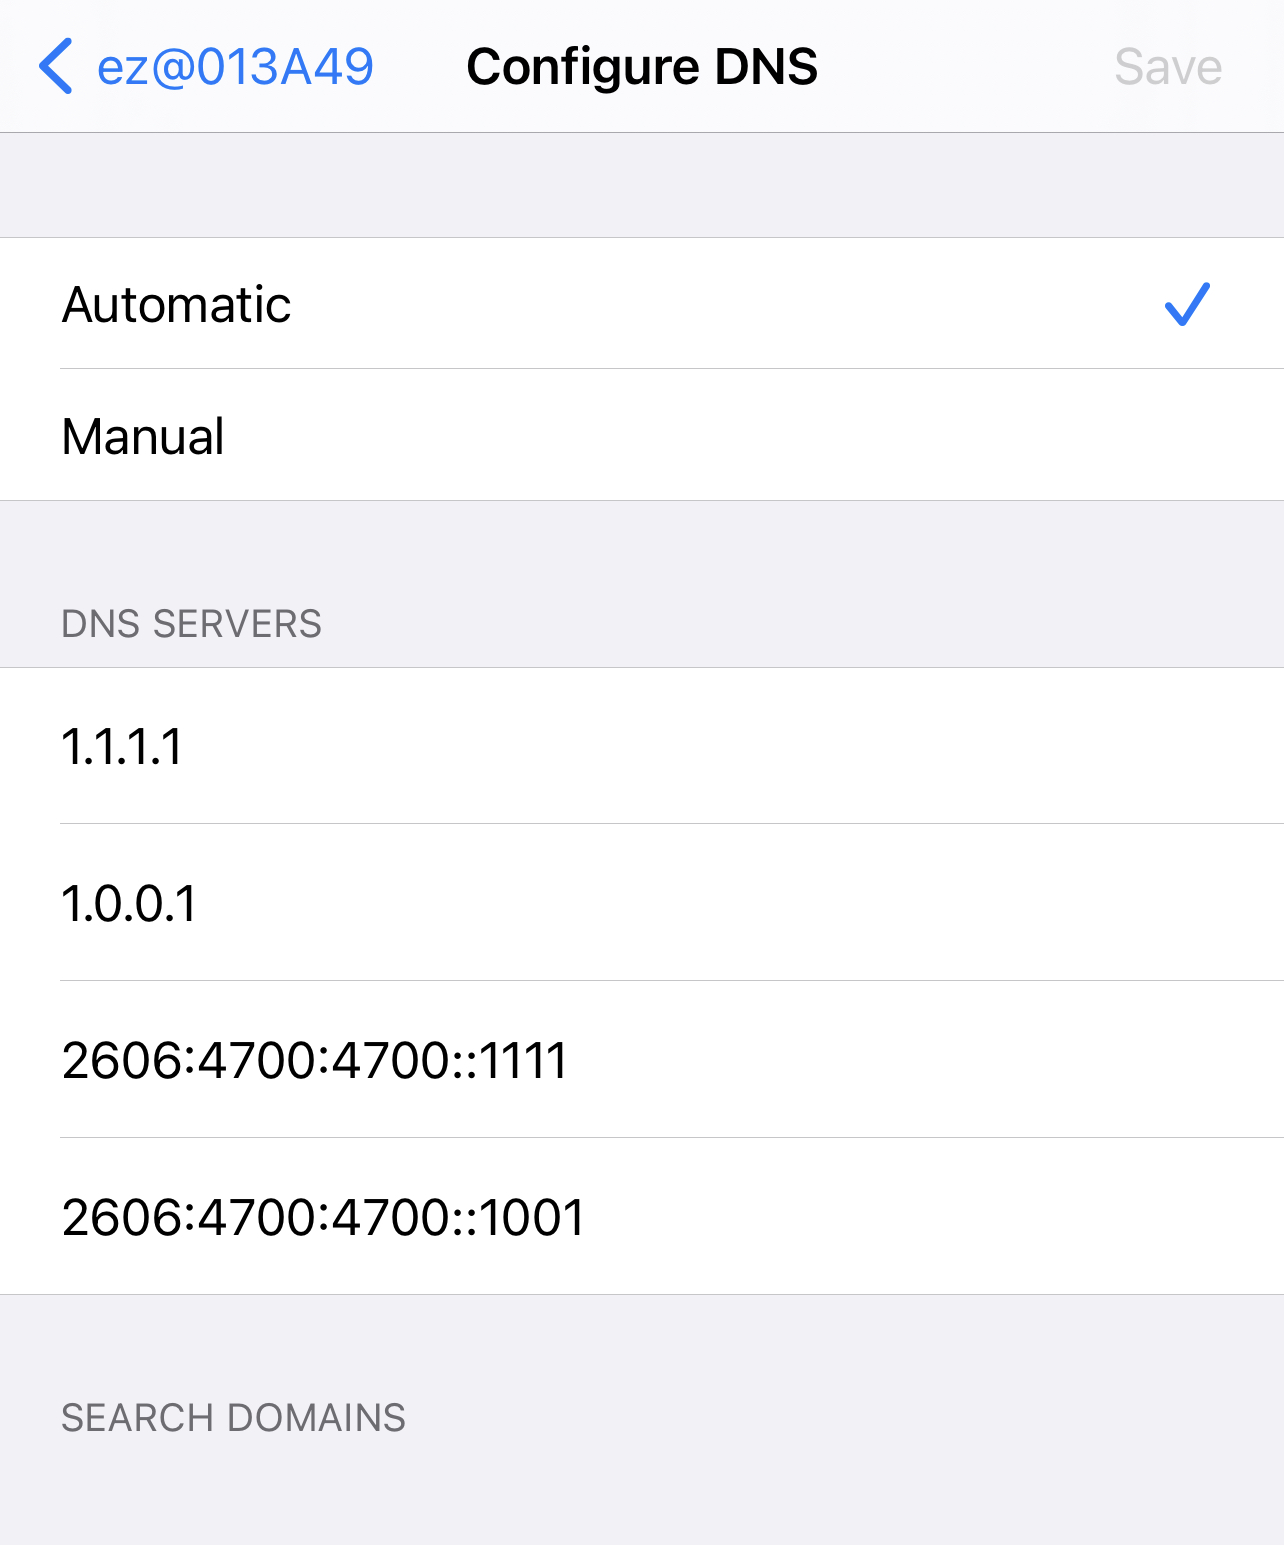
On IOS client devices, you can verify your settings by going to the Settings --> Wi-Fi. Ensure you are connected to the ezhotspot, then click on the blue Info icon on the right. Scroll down to Configure DNS and click on it. It will show you that it is being automatically assigned with the desired DNS settings as shown in the picture below.
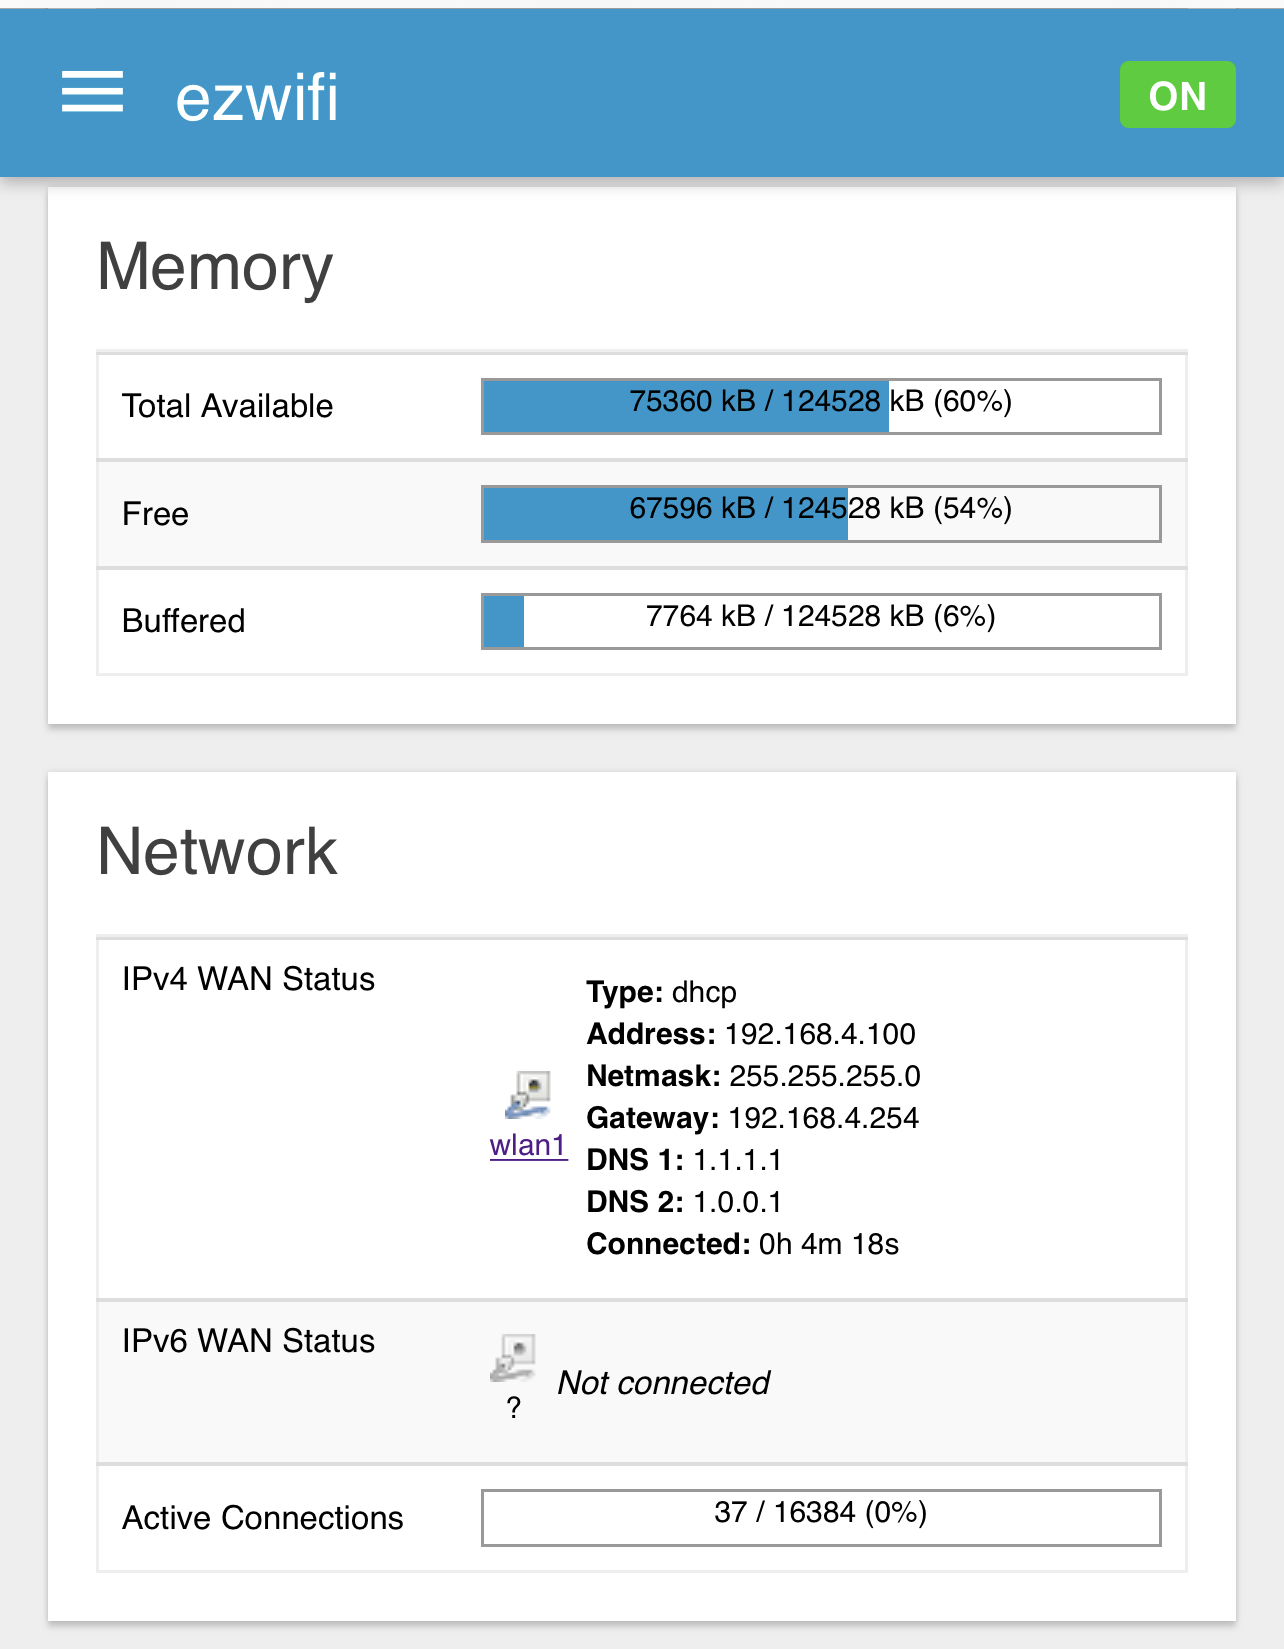
On the ezhotspot extender, go to Advanced Dashboard --> Status -- > Overview --> Network . It will show that the ezhotspot is now using the customized DNS settings, as shown in picture below.
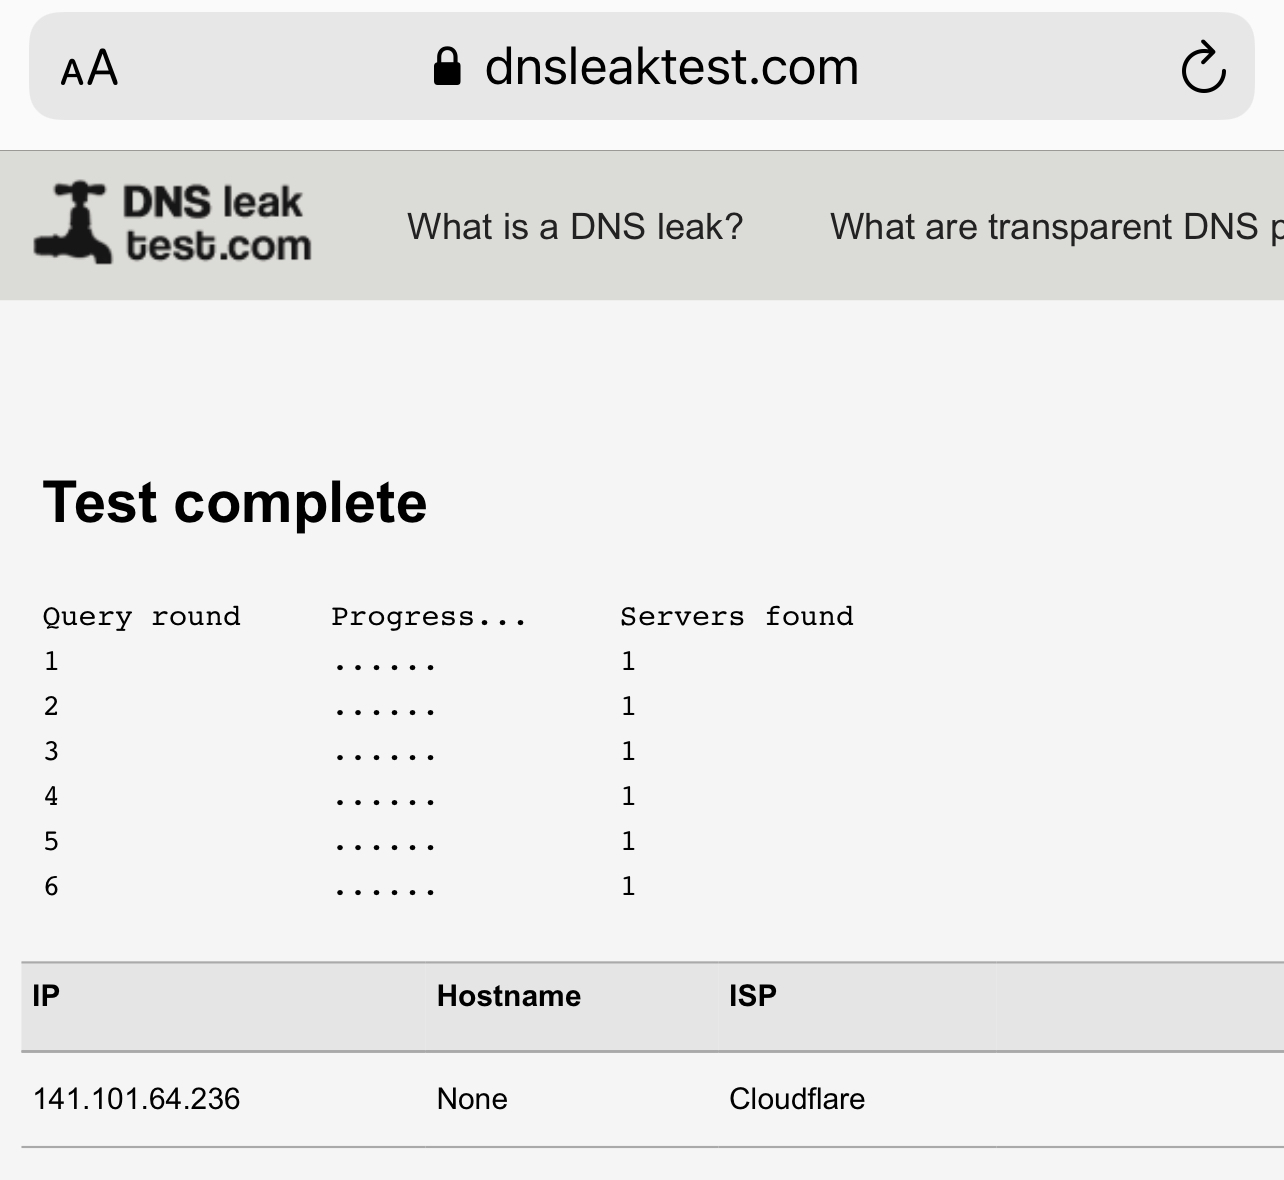
Open a web browser to https://dnsleaktest.com . Click on the Extended test. The result should show only your desired DNS provider. The IP result may not be the same as what you have specified because the DNS inquiry is being re-direct to one of their regional DNS servers near to your geographical location.
Important Note:
On some public hotspot with captive portal, it may be required to use their DNS servers so that your web browser can be re-direct to their private login page. In this case, you should
- Enable PART C #3 to Use DNS server advertised by peer.
- Click on SAVE & APPLY.
- Go to Advanced Dashboard --> Status -- > Overview --> Network
- Write down the assigned DNS as shown.
- Add the additional DNS settings in PART A and PART C of this tutorial.